In several languages, a knitting pattern is called a recipe. Like with food, there are aspects you don’t change – a paella without rice is no longer a paella – but a skilled cook knows exactly where they can tweak it, which vegetable will work in place of another, how much salt will improve it or ruin it. It becomes more than a written set of instructions. Instead it’s an expression of the cook’s creativity, experience and personality. How many dishes just taste better when cooked by a certain someone in your life? That’s the difference the cook makes.

And for a knitting pattern, the knitter has those same choices too. At the risk of making this blog too technical, I’m going to attempt to write about those choices, about why I made them and why I think they matter here, more so than for any other pattern I’ve knitted.
I’m recreating something from the past – at least that’s the goal. It will never be a perfect replica of that moment in time but it can get pretty damn close. When I’ve made other vintage and historical patterns, I’ve not worried overmuch about accuracy. I’m making something for myself to wear because I like them; the finished garment is the goal, not the technical process. With this jumper, though, it matters to me that it reflects the written pattern as closely as possible. This isn’t going to be presented as a jumper from 1981; it’s a jumper of the Spare Rib pattern and a way for non-knitters to better understand the code we communicate our craft in.
First step is to pick the materials. The pattern specifies “pure wool”, which jumped out at me as a little unusual. ‘Bri-nylon’ was introduced in the late 50s and the fibre content of yarns underwent a radical shift as more manmade fibres entered the marketplace. Suddenly, knitwear could be washable, mothproof and all kinds of interesting textures. Wool blended with other things was, by this point, so common that I find it notable that the pattern specifies pure wool. As for why, I don’t know. Maybe something about the rustic nature of it appealed to the designer. If that’s the case then I need to pick a yarn with those qualities, something unfussy, maybe with a little scratch.
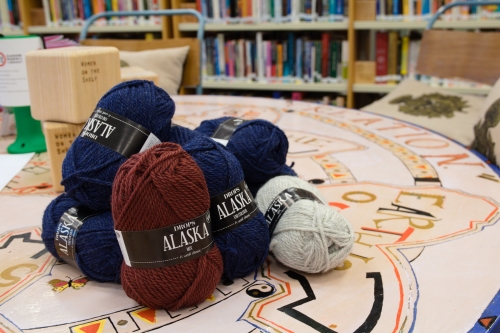
For some years, my first stop when I need a workhorse yarn is the Norwegian company Drops so their Drops Alaska yarn seems like a perfect choice. It’s 100% wool with all the same qualities I’m looking for and comes in a variety of colours. The pattern suggests the colours navy, burgundy and grey so that’s what I go for: Navy Blue for the body and Pearl Grey and Burgundy for the venus symbol band.
With my yarn chosen, I knit up a tension square. Before you make anything, it’s recommended you knit a 10cm by 10cm piece using the same needles and yarn you’re going to make your finished garment in. That way, you know that your finished measurements will match the designer’s ones and you won’t get a jumper that’s wildly bigger or smaller than you’d planned.
So, with my tension on point and my needles ready to go, it’s time to cast-on. There’s a joke in knitting circles: “Everyone casts-on the same.” “Really, which one do you use?” “The one my mum/granny/the woman in the shop [delete as appropriate] taught me.” Most people can’t name their cast-on, it’s just the one they use, a tactile tradition passed from woman to woman. There’s a few different ones used commonly but most people just consider it ‘casting on’. I have a few favourite cast-ons but something told me it would be worth checking which ones would be most in use in the late 70s and early 80s.
One of the benefits of being a Glasgow Women’s Library volunteer is having easy access to the archives and the many, many knitting patterns and publications that have been donated over the years. These are going to be my reference guides: before I do anything I need to double check with them that the technique I’m using is appropriate. It’s a strange way to knit. My hands will happily do an action they’ve done hundreds of times before with very little input from my brain but now I’m asking them to wait while I check if they’re allowed to do it like that.
To pick my cast-on, I check a few publications: ‘Your Guide to Better Knitting’, a 1964 pull out from the magazine Woman’s Own; Knitting Fashion: A Step by Step Guide to Knitting & Crochet, a 1976 book published to accompany a BBC series; and Golden Hands, a multicraft magazine published from 1971 to 1973 and republished throughout the decade.
Golden Hands is a fascinating publication, covering knitting, crochet, dress making, embroidery, various forms of lace making and that 70s classic macrame. Each issue introduced a new technique to build your skills and patterns on which to try them out. Chatting to women who crafted in the 70s, diving into archives and private collections, and stumbling across them in charity shops, their popularity is undeniable. But their importance seems to have been neglected by academia – there’s plenty on craft in women’s magazines but almost nothing on craft magazines from this period.
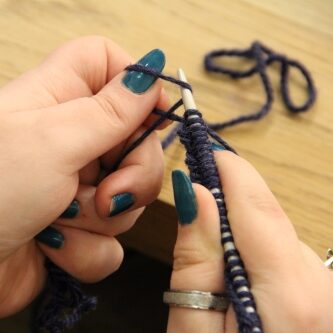
From my sources, I pick a long tail cast-on (also known by at least half a dozen other names). It’s the stretchiest of the ones described but wouldn’t be my first choice to start a jumper. Then I knit my way up the back piece, first with a stretchy rib then changing to a bigger needle and knitting the body of the jumper. I leave little stitch markers every 10 rows to keep track of how many I’ve done.
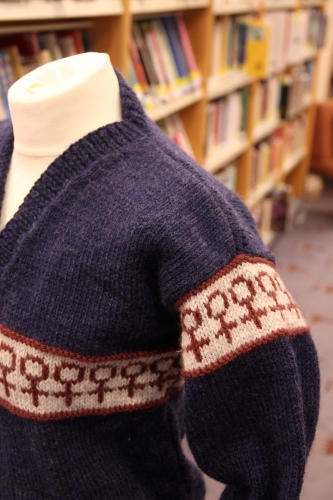
The first surprise of this jumper comes when I get ready to start the distinctive band of venus symbols. It tells me to “Work 2 rows C1 in g. st.” I read it again and then reread it again. “C1” refers to the Burgundy yarn – I was expecting to start the grey here. But it also wants me to work in “g. st.” which means in garter stitch. Instead of going straight into the motif, there’s a little ridge in a contrasting colour. It’s a lovely little design element, completely invisible in the black-and-white photos. It’s also the first time that my decision to do this project really pays dividends – even with all my experience, just reading the pattern through, I completely missed that until I actually knitted it up.
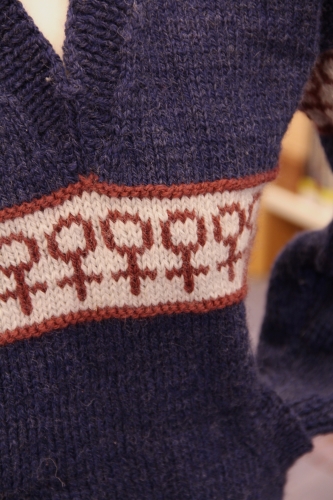
It’s the most visually striking part of the pattern but, technically speaking, the motif is nothing special. You could really replace it with any symbol and it would still work. (I’ll talk about this issue more in Part 4, how the finished garment was more important than the process and the ways yarn companies shaped the process of knitting in the 20th century.) It is worth saying, though, that stranded knitting – knitting with two colours on the same row without cutting the yarn in between – is not a beginners technique. In fact, as I knit, I realise that none of this pattern is really written for a beginner knitter. Its boxy shaping is simple enough but the tightness of the language isn’t accessible to a newer knitter. I’m reminded of the even older patterns I’ve read that assume a certain level of competency and familiarity with patterns and pattern reading. If you don’t know how to do something, the pattern isn’t going to help you, nor is it going to tell you where to find help. This also isn’t the “this is how you do this skill” type piece that crops up in earlier issues of Spare Rib – you’re expected to know how to knit already. While wearing the Venus band on the jumper is undeniably radical and there can be no doubt about the political leanings of any woman who does, the pattern itself, in its writing and construction, is still fairly conservative. It is, to reuse a phrase from Part 1, your mother’s knitting with a modern motif.
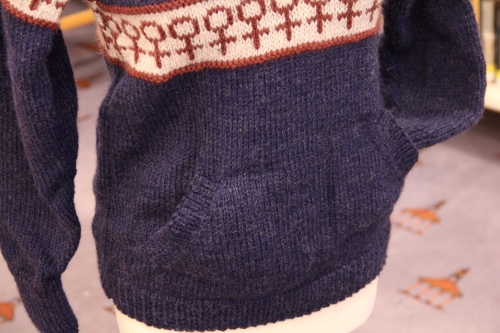
I continue up the back and it’s all pretty straightforward and familiar. When I start the front piece, the pockets are the first difference to the back. They’re not recommended for inexperienced knitters and only just visible in the photos but, to me, they are as much a feminist statement as the venus motif. This is where I get to talk about pockets. Or more importantly, the lack of pockets in women’s clothes.
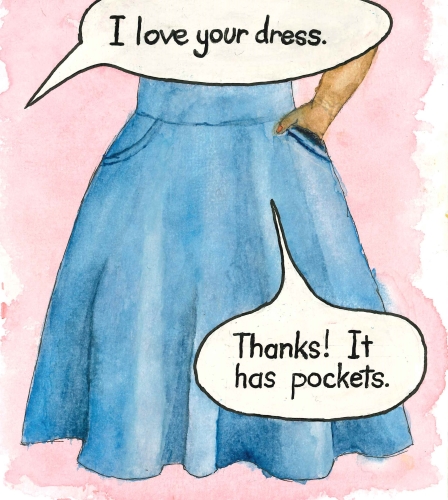
The exchange “I love your dress.” “Thanks, it has pockets.” has become a meme in its own right simply because of the dearth of them in womenswear. Even when we have them, they’re smaller than clothes in menswear. This hasn’t always been the case and it turns out the history of the pockets is long and complex, touching on ideas of intimacy, class and gender roles.1 But to summarise it very, very briefly: when women wore dresses with big skirts, they had what were known as ‘tie on pockets’ tucked underneath their petticoats. As silhouettes got sleeker at the start of the 19th century – think Jane Austen, regency gowns – tie on pockets were no longer practical and ‘reticules’ or little drawstring handbags became the thing and the pocket never really recovered. ‘Sewn in’ pockets show up in womenswear but they take their cues from tailoring and are too small to be useful. When we hit the 20th century, the sewn in pocket continues to be tiny and women get bigger handbags to compensate. Designers and pattern cutters then refuse to make pockets because they believe it ruins the silhouette of the garment. Today, handbags are the big moneymaker in the fashion industry and, to keep costs down in fast fashion, the pocket is the first thing to go from a design. This leaves us with pockets that are smaller and less useful than those of 17th century women.2
Which brings me back to the jumper – it has pockets that you can put your keys, cash, bus ticket, whatever in. In this regard, it’s radical as a garment. The making of the jumper actively subverts the world in which women’s needs are dismissed in order to adhere to an aesthetic ideal: your jumper has pockets because you want them and you can choose what goes in them. You’re not beholden to a designer’s ideas of what you need, you become your own designer.
What strikes me about this jumper is that it’s almost analogous to Spare Rib itself. Both are attempting to be progressive within more traditional systems. Spare Rib was sold in WHSmiths and funded by advertising just like other women’s magazines – it attempted to communicate progressive ideas inside a typical publishing model.3 The jumper is doing the same: the motif is radical, the pockets are radical, the construction is not. It’s attempting to be progressive inside the confines of the knitting culture of its period but not expand on that culture.
I’m halfway down one arm when I run out of yarn and discover a mistake I made right at the start. My yarn is Aran weight and the pattern says “double knitting pure wool”. Aran is about 25% thicker than Double Knitting. But my tension was perfect so where did I go wrong? Well I think the honest answer is: my experience did me dirty. Instead of reading the instruction to knit in DK, I read the needle size and tension and went “oh that’s an Aran”. I tripped up by knowing just a smidgen too much about knitting.
What difference will it make? Hopefully, not as much as it could’ve. Because my tension is right, the jumper will still end up the right size. The only noticeable issue might be the way the finished fabric drapes. A thinner yarn on bigger needles will give a more open, slouchy knit but, if you don’t know I’ve made the mistake, you wouldn’t notice it. I decide against scrapping weeks of work but I’ll make sure I acknowledge my mistake in the notes that will accompany it into the archive. Does this compromise the accuracy of it and my goal of creating “a jumper of the Spare Rib pattern”? It might do. At the same time, I might be the only person who’ll care. And, let’s be honest, if I made that mistake, I wouldn’t be surprised if someone in 1982 made exactly the same one too.

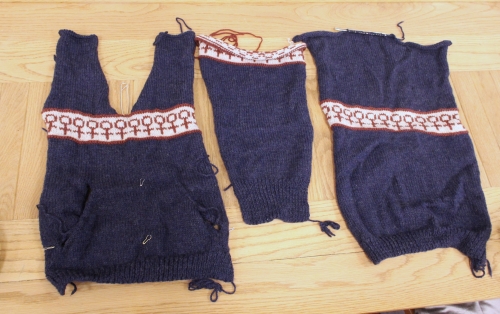
Finally, I have four pieces of fabric (front, back and two sleeves) ready to sew together to make a jumper. Before I do that though I have to add the collar. My notes on this step read, “I hate this, it is awful, why would anybody do this”. With straight needles, I have to pick up and knit across the back and down the front – in essence, I’m knitting an oval in a straight line. I almost break and get out my circulars but persevere through the hellish experience. This is one of the techniques we were right to leave in the past.
The final, final step is to sew it all up. And I hate seaming knitting so much, I knitted an entire other jumper in the time I spent avoiding it. Eventually, though, I grit my teeth and sew. I hate it just as much as I expected, cursing with each stab of my blunt needle at the use of backstitch and how the inky navy yarn strains my eyes. Eventually, though, the pieces of knit fabric join together, forming a jumper.
There’s a strange nostalgia involved in giving away a piece of knitting. Pride, of course, in a job well done but sadness too, knowing that this item you’ve spent hours on, each yard of yarn slipping through your fingers, will soon be gone. It lives in your mind forever in that moment just before you hand it over, a perfectly preserved piece of knitting that you both hope and fear is still like that: fear that it’s so unloved that it’s completely unaltered by time and wear; hope that the recipient loved it enough to care for it.
Giving the jumper to the Women’s Library means that my mental image of it will likely match the real garment forever. It won’t be worn or wear out but it also won’t be neglected and unloved. Its purpose is different to every other jumper I’ve made: it’s not keeping anyone warm, it’s stitching together different fields of knowledge.
And anyway, I loved it so much, I made another. That’s Part 3.
- Carlson, Hannah. Pockets: An Intimate History of How We Keep Things Close. First edition, Algonquin Books of Chapel Hill, 2023. ↩︎
- Trufelman, Avrey. Articles on Interest. S4 E13 More Pockets, https://articlesofinterest.substack.com/p/more-pockets. ↩︎
- Mayne, Alison. ‘Stitchy Fingers: Making by Hand in the First Decade of “Spare Rib”’. MAI: Feminism & Visual Culture, no. 8, Dec. 2021, https://maifeminism.com/stitchy-fingers-making-by-hand-in-the-first-decade-of-spare-rib/. ↩︎
One reply on “Knitting the Woman’s Woolly: Part 2 – P1R1 (Progress 1, Regress 1)”
I love it Becky, and having ‘ accompanied’ you through the process and the Aran wool issue, I think that the finished result is fab. I might just be tempted to make myself one, but not in those colours – these were my school uniform. Love the blog too.